Introduction
This quickstart guide provides a basic introduction to the Laravel framework and includes content on database migrations, the Eloquent ORM, routing, validation, views, and Blade templates. This is a great starting point if you are brand new to the Laravel framework or PHP frameworks in general. If you have already used Laravel or other PHP frameworks, you may wish to consult one of our more advanced quickstarts.
To sample a basic selection of Laravel features, we will build a simple task list we can use to track all of the tasks we want to accomplish (the typical "to-do list" example). The complete, finished source code for this project is available on GitHub.
Installation
Of course, first you will need a fresh installation of the Laravel framework. You may use the Homestead virtual machine or the local PHP environment of your choice to run the framework. Once your local environment is ready, you may install the Laravel framework using Composer:
composer create-project laravel/laravel quickstart --prefer-dist
You're free to just read along for the remainder of this quickstart; however, if you would like to download the source code for this quickstart and run it on your local machine, you may clone its Git repository and install its dependencies:
git clone https://github.com/laravel/quickstart-basic quickstart
cd quickstart
composer install
php artisan migrate
For more complete documentation on building a local Laravel development environment, check out the full Homestead and installation documentation.
Prepping The Database
Database Migrations
First, let's use a migration to define a database table to hold all of our tasks. Laravel's database migrations provide an easy way to define your database table structure and modifications using fluent, expressive PHP code. Instead of telling your team members to manually add columns to their local copy of the database, your teammates can simply run the migrations you push into source control.
So, let's build a database table that will hold all of
our tasks. The Artisan CLI
can be used to generate a variety of classes and will
save you a lot of typing as you build your Laravel
projects. In this case, let's use the
make:migration command to generate a new
database migration for our tasks table:
php artisan make:migration create_tasks_table --create=tasks
The migration will be placed in the
database/migrations directory of your
project. As you may have noticed, the
make:migration command already added an
auto-incrementing ID and timestamps to the migration
file. Let's edit this file and add an additional
string column for the name of our
tasks:
<?php

use Illuminate\Database\Schema\Blueprint;
use Illuminate\Database\Migrations\Migration;

class CreateTasksTable extends Migration
{
    /**
     * Run the migrations.
     *
     * @return void
     */
    public function up()
    {
        Schema::create('tasks', function (Blueprint $table) {
            $table->increments('id');
            $table->string('name');
            $table->timestamps();
        });
    }

    /**
     * Reverse the migrations.
     *
     * @return void
     */
    public function down()
    {
        Schema::drop('tasks');
    }
}
To run our migration, we will use the
migrate Artisan command. If you are using
Homestead, you should run this command from within your
virtual machine, since your host machine will not have
direct access to the database:
php artisan migrate
This command will create all of our database tables. If
you inspect the database tables using the database
client of your choice, you should see a new
tasks table which contains the columns
defined in our migration. Next, we're ready to define an
Eloquent ORM model for our tasks!
Eloquent Models
Eloquent is Laravel's default ORM (object-relational mapper). Eloquent makes it painless to retrieve and store data in your database using clearly defined "models". Usually, each Eloquent model corresponds directly with a single database table.
So, let's define a Task model that
corresponds to our tasks database table we
just created. Again, we can use an Artisan command to
generate this model. In this case, we'll use the
make:model command:
php artisan make:model Task
The model will be placed in the app
directory of your application. By default, the model
class is empty. We do not have to explicitly tell the
Eloquent model which table it corresponds to because it
will assume the database table is the plural form of the
model name. So, in this case, the Task
model is assumed to correspond with the
tasks database table. Here is what our
empty model should look like:
<?php

namespace App;

use Illuminate\Database\Eloquent\Model;

class Task extends Model
{
	//
}
We'll learn more about how to use Eloquent models as we add routes to our application. Of course, feel free to consult the complete Eloquent documentation for more information.
Routing
Stubbing The Routes
Next, we're ready to add a few routes to our application.
Routes are used to point URLs to controllers or
anonymous functions that should be executed when a user
accesses a given page. By default, all Laravel routes
are defined in the app/Http/routes.php file
that is included in every new project.
For this application, we know we will need at least three
routes: a route to display a list of all of our tasks, a
route to add new tasks, and a route to delete existing
tasks. So, let's stub all of these routes in the
app/Http/routes.php file:
<?php

use App\Task;
use Illuminate\Http\Request;

/**
 * Display All Tasks
 */
Route::get('/', function () {
	//
});

/**
 * Add A New Task
 */
Route::post('/task', function (Request $request) {
	//
});

/**
 * Delete An Existing Task
 */
Route::delete('/task/{id}', function ($id) {
	//
});
Displaying A View
Next, let's fill out our / route. From this
route, we want to render an HTML template that contains
a form to add new tasks, as well as a list of all
current tasks.
In Laravel, all HTML templates are stored in the
resources/views directory, and we can use
the view helper to return one of these
templates from our route:
Route::get('/', function () {
	return view('tasks');
});
Of course, we need to actually define this view, so let's do that now!
Building Layouts & Views
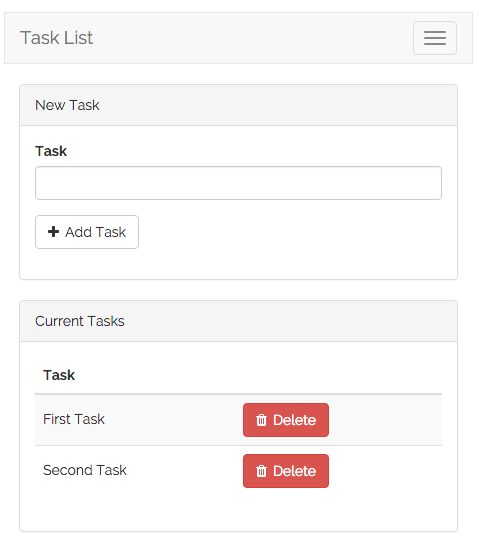
This application only has a single view which contains a form for adding new tasks as well as a listing of all current tasks. To help you visualize the view, here is a screenshot of the finished application with basic Bootstrap CSS styling applied:
Defining The Layout
Almost all web applications share the same layout across pages. For example, this application has a top navigation bar that would be typically present on every page (if we had more than one). Laravel makes it easy to share these common features across every page using Blade layouts.
As we discussed earlier, all Laravel views are stored in
resources/views. So, let's define a new
layout view in
resources/views/layouts/app.blade.php. The
.blade.php extension instructs the
framework to use the Blade
templating engine to render the view. Of course,
you may use plain PHP templates with Laravel. However,
Blade provides convenient short-cuts for writing
cleaner, terse templates.
Our app.blade.php view should look like the
following:
// resources/views/layouts/app.blade.php

<!DOCTYPE html>
<html lang="en">
	<head>
		<title>Laravel Quickstart - Basic</title>

		<!-- CSS And JavaScript -->
	</head>

	<body>
		<div class="container">
			<nav class="navbar navbar-default">
				<!-- Navbar Contents -->
			</nav>
		</div>

		@yield('content')
	</body>
</html>
Note the @yield('content') portion of the
layout. This is a special Blade directive that specifies
where all child pages that extend the layout can inject
their own content. Next, let's define the child view
that will use this layout and provide its primary
content.
Defining The Child View
Great, our application layout is finished. Next, we need
to define a view that contains a form to create a new
task as well as a table that lists all existing tasks.
Let's define this view in
resources/views/tasks.blade.php.
We'll skip over some of the Bootstrap CSS boilerplate and only focus on the things that matter. Remember, you can download the full source for this application on GitHub:
// resources/views/tasks.blade.php

@extends('layouts.app')

@section('content')

    <!-- Bootstrap Boilerplate... -->

	<div class="panel-body">
        <!-- Display Validation Errors -->
		@include('common.errors')

		<!-- New Task Form -->
		<form action="/task" method="POST" class="form-horizontal">
			{{ csrf_field() }}

            <!-- Task Name -->
			<div class="form-group">
				<label for="task" class="col-sm-3 control-label">Task</label>

				<div class="col-sm-6">
					<input type="text" name="name" id="task-name" class="form-control">
				</div>
			</div>

            <!-- Add Task Button -->
			<div class="form-group">
				<div class="col-sm-offset-3 col-sm-6">
					<button type="submit" class="btn btn-default">
						<i class="fa fa-plus"></i> Add Task
					</button>
				</div>
			</div>
		</form>
	</div>

	<!-- TODO: Current Tasks -->
@endsection
A Few Notes Of Explanation
Before moving on, let's talk about this template a bit.
First, the @extends directive informs Blade
that we are using the layout we defined at
resources/views/layouts/app.blade.php. All
of the content between @section('content')
and @endsection will be injected into the
location of the @yield('content') directive
within the app.blade.php layout.
Now we have defined a basic layout and view for our
application. Remember, we are returning this view from
our / route like so:
Route::get('/', function () {
	return view('tasks');
});
Next, we're ready to add code to our POST
/task route to handle the incoming form input
and add a new task to the database.
Note: The
@include('common.errors')directive will load the template located atresources/views/common/errors.blade.php. We haven't defined this template, but we will soon!
Adding Tasks
Validation
Now that we have a form in our view, we need to add code
to our POST /task route to validate the
incoming form input and create a new task. First, let's
validate the input.
For this form, we will make the name field
required and state that it must contain less than
255 characters. If the validation fails, we
will redirect the user back to the / URL,
as well as flash the old input and errors into the session:
Route::post('/task', function (Request $request) {
	$validator = Validator::make($request->all(), [
		'name' => 'required|max:255',
	]);

	if ($validator->fails()) {
		return redirect('/')
			->withInput()
			->withErrors($validator);
	}

	// Create The Task...
});
The $errors Variable
Let's take a break for a moment to talk about the
->withErrors($validator) portion of this
example. The ->withErrors($validator)
call will flash the errors from the given validator
instance into the session so that they can be accessed
via the $errors variable in our view.
Remember that we used the
@include('common.errors') directive within
our view to render the form's validation errors. The
common.errors will allow us to easily show
validation errors in the same format across all of our
pages. Let's define the contents of this view now:
// resources/views/common/errors.blade.php

@if (count($errors) > 0)
    <!-- Form Error List -->
    <div class="alert alert-danger">
        <strong>Whoops! Something went wrong!</strong>

        <br><br>

        <ul>
            @foreach ($errors->all() as $error)
                <li>{{ $error }}</li>
            @endforeach
        </ul>
    </div>
@endif
Note: The
$errorsvariable is available in every Laravel view. It will simply be an empty instance ofViewErrorBagif no validation errors are present.
Creating The Task
Now that input validation is handled, let's actually
create a new task by continuing to fill out our route.
Once the new task has been created, we will redirect the
user back to the / URL. To create the task,
we may use the save method after creating
and setting properties on a new Eloquent model:
Route::post('/task', function (Request $request) {
	$validator = Validator::make($request->all(), [
		'name' => 'required|max:255',
	]);

	if ($validator->fails()) {
		return redirect('/')
			->withInput()
			->withErrors($validator);
	}

	$task = new Task;
	$task->name = $request->name;
	$task->save();

	return redirect('/');
});
Great! We can now successfully create tasks. Next, let's continue adding to our view by building a list of all existing tasks.
Displaying Existing Tasks
First, we need to edit our / route to pass
all of the existing tasks to the view. The
view function accepts a second argument
which is an array of data that will be made available to
the view, where each key in the array will become a
variable within the view:
Route::get('/', function () {
	$tasks = Task::orderBy('created_at', 'asc')->get();

	return view('tasks', [
		'tasks' => $tasks
	]);
});
Once the data is passed, we can spin through the tasks in
our tasks.blade.php view and display them
in a table. The @foreach Blade construct
allows us to write concise loops that compile down into
blazing fast plain PHP code:
@extends('layouts.app')
@section('content')
<!-- Create Task Form... -->
<!-- Current Tasks -->
@if (count($tasks) > 0)
<div class="panel panel-default">
<div class="panel-heading">
Current Tasks
</div>
<div class="panel-body">
<table class="table table-striped task-table">
<!-- Table Headings -->
<thead>
<th>Task</th>
<th> </th>
</thead>
<!-- Table Body -->
<tbody>
@foreach ($tasks as $task)
<tr>
<!-- Task Name -->
<td class="table-text">
<div>{{ $task->name }}</div>
</td>
<td>
<!-- TODO: Delete Button -->
</td>
</tr>
@endforeach
</tbody>
</table>
</div>
</div>
@endif
@endsection
Our task application is almost complete. But, we have no way to delete our existing tasks when they're done. Let's add that next!
Deleting Tasks
Adding The Delete Button
We left a "TODO" note in our code where our
delete button is supposed to be. So, let's add a delete
button to each row of our task listing within the
tasks.blade.php view. We'll create a small
single-button form for each task in the list. When the
button is clicked, a DELETE /task request
will be sent to the application:
<tr>
    <!-- Task Name -->
    <td class="table-text">
        <div>{{ $task->name }}</div>
    </td>

    <!-- Delete Button -->
    <td>
        <form action="/task/{{ $task->id }}" method="POST">
            {{ csrf_field() }}
            {{ method_field('DELETE') }}

            <button>Delete Task</button>
        </form>
    </td>
</tr>
A Note On Method Spoofing
Note that the delete button's form method is
listed as POST, even though we are
responding to the request using a
Route::delete route. HTML forms only allow
the GET and POST HTTP verbs,
so we need a way to spoof a DELETE request
from the form.
We can spoof a DELETE request by outputting
the results of the method_field('DELETE')
function within our form. This function generates a
hidden form input that Laravel recognizes and will use
to override the actual HTTP request method. The
generated field will look like the following:
<input type="hidden" name="_method" value="DELETE">
Deleting The Task
Finally, let's add logic to our route to actually delete
the given task. We can use the Eloquent
findOrFail method to retrieve a model by ID
or throw a 404 exception if the model does not exist.
Once we retrieve the model, we will use the
delete method to delete the record. Once
the record is deleted, we will redirect the user back to
the / URL:
Route::delete('/task/{id}', function ($id) {
	Task::findOrFail($id)->delete();

	return redirect('/');
});